Arduino Digital and Analog Pins
Short Answer (Featured Snippet):
In Arduino, digital pins work with only two states: HIGH (ON) and LOW (OFF).
Analog pins are used to read variable voltage values from sensors, converting them into numbers between 0 and 1023.
Arduino pins act as a bridge between code and the physical world.
Turning on an LED, pressing a button, or reading data from a sensor is possible thanks to these pins.
What Are Arduino Pins?
Arduino pins are connection points that allow the board to communicate with external electronic components.
Using Arduino pins, you can:
- Read data from sensors
- Control LEDs, motors, and relays
- Manage physical events using software
There are two main types of Arduino pins:
- Digital Pins
- Analog Pins
What Are Arduino Digital Pins?
Digital pins operate with only two possible states:
| State | Meaning |
|---|---|
| LOW | 0V – OFF |
| HIGH | 5V / 3.3V – ON |
📌 Digital pins work using a simple ON/OFF logic.
What Are Digital Pins Used For?
Digital pins are commonly used as OUTPUT or INPUT pins.
Digital Pins as OUTPUT (Output Components)
Components that work only according to Arduino commands and do not send data back are considered output components:
- LED
- RGB LED
- Buzzer
- Servo motor
- DC motor
- Stepper motor
- Relay
- LCD / OLED display
📌 These components are usually connected to digital pins.
Digital OUTPUT Example
pinMode(13, OUTPUT);
digitalWrite(13, HIGH); // LED turns ON
Digital Pins as INPUT (Input Components)
Components that send data to Arduino are used as input devices:
- Buttons and switches
- Joystick
- Potentiometer
- Temperature & humidity sensors (DHT11 / DHT22)
- LDR (light sensor)
- Gas sensors (MQ series)
- Ultrasonic distance sensor (HC-SR04)
- PIR motion sensor
- Sound sensor
- Touch sensor (TTP223)
- RFID reader
- Keypad
📌 These components can be connected to digital or analog pins, depending on the sensor type.
pinMode(A0, INPUT);
int sensorValue = analogRead(A0);
What Are Arduino Analog Pins?
Analog pins can read variable voltage values. Unlike digital pins, they do not work only as ON/OFF but can detect intermediate values.
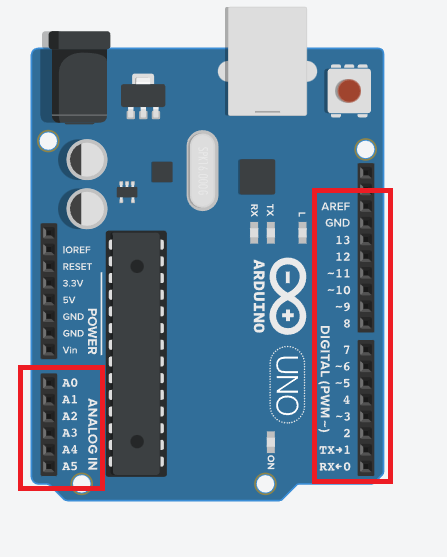
On the Arduino UNO, analog pins are:
A0, A1, A2, A3, A4, A5
These pins are mainly used to read continuously changing sensor data.
How Do Analog Pins Work?
Arduino analog pins measure the voltage coming from a sensor and convert it into a digital number.
| Read Value | Voltage |
|---|---|
| 0 | 0V |
| 1023 | 5V |
📌 Arduino converts::
- 0V → 0
- 5V → 1023
- Any voltage in between → proportional values
This process is called Analog-to-Digital Conversion (ADC).
What Are Analog Pins Used For?
Analog pins are mainly used for sensor readings, such as:
- Potentiometer
- Temperature sensor
- Light sensor (LDR)
- Humidity sensor
- Gas sensor
- Distance sensors
These sensors generate continuously changing values.
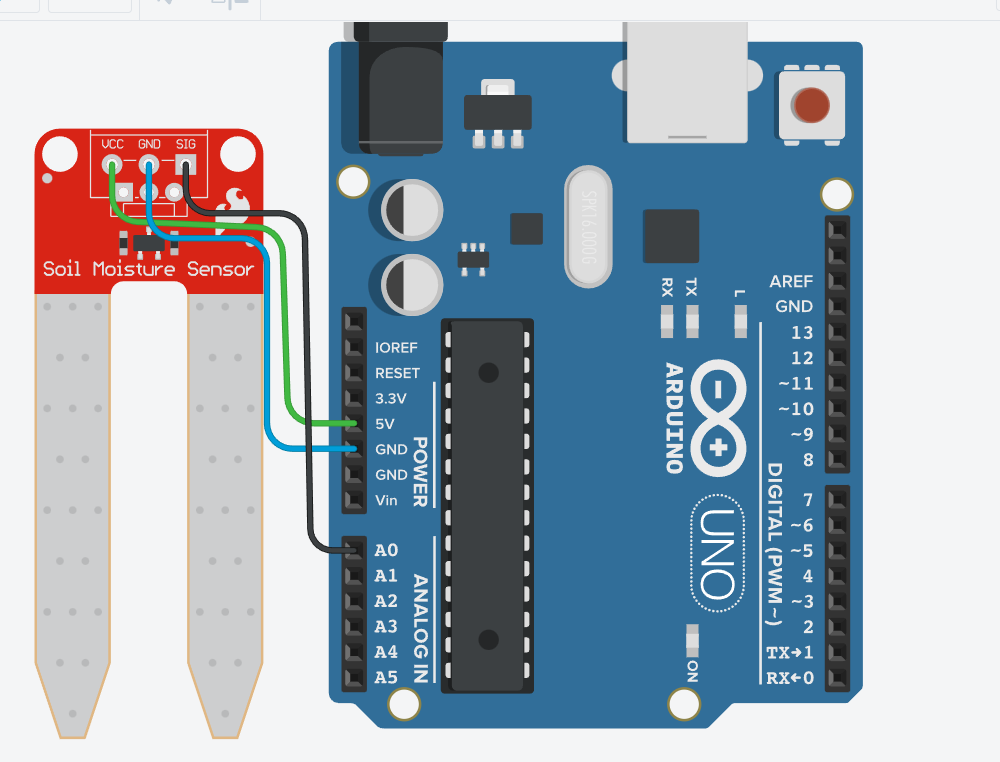
How to Connect Sensors to Arduino
Most analog sensors follow this basic connection logic:
| Sensor Pin | Arduino Pin |
|---|---|
| VCC | 5V |
| - | GND |
| OUT | Analog Pin (A0, A1…) |
📌 Without a proper GND connection, the sensor will not work correctly.
“Below is an example showing how to connect a sensor.”
Using Analog Pins (analogRead)
To read data from an analog pin, the analogRead() unction is used
int sensorValue = analogRead(A0);
This code:
- Reads the sensor connected to pin A0
- Returns a value between 0 and 1023
Difference Between Digital and Analog Pins
| Feature | Dijital Pin | Analog Pin |
|---|---|---|
| Values | HIGH / LOW | 0 – 1023 |
| Logic | ON / OFF | Continuous |
| Usage | LED, buton | Sensors |
| Function | digitalRead / digitalWrite | analogRead |
Common Arduino Pin Mistakes
❌ Using the wrong pin type ❌ Forgetting the GND connection ❌ Connecting a sensor to the wrong pin ❌ Using analogRead() on a digital pin
These mistakes can cause the circuit not to work, even if the code looks correct.
Conclusion
-
Arduino digital and analog pins:
-
Form the foundation of Arduino projects
-
Connect the physical world with software
-
Reduce errors when used correctly
Understanding how pins work is one of the most important steps to building stable and successful Arduino projects 🚀